When you talk about mining cryptocurrencies people usually think about special and expensive power-hungry equipment doing heavy calculations 24/7. Indeed, currently this is the picture when mining using the famous Proof of Work (PoW) consensus of Bitcoin and many others. There are many reasons to love Bitcoin, but reports about the huge energy consumption in its mining process are frequent, e.g. “Bitcoin consumes more electricity than Argentina”. The usual PoW requirements make it very inconvenient to mine at your home, it generates a lot of heat and noise, not to mention environmental concerns.
What most people don’t know is that there is a home/environment friendly alternative, known as Proof of Capacity (PoC). With this method you do the heavy calculations only once and save them on your hard drive. Later, you just need to read a small fraction of this information every few minutes. All this using equipment you already have. The best part, the mining process is so light that you can even continue to work, study, play games, watch videos, etc. on the same computer. You can just keep it in the background and you won’t even notice.
The PoC consensus used by Signum (previously know as Burstcoin) has been running since 2014. The problem for the average user has been the requirement to run many different tools to get the mining process to work. A tool to prepare your hard disks, another to handle your coins and join a mining pool, and yet another one to actually mine. Not to mention having to edit text files to configure these tools and having to use command line arguments.
Enter 2021. There is a new tool that combines all that is needed to mine with your hard drive in a few simple mouse clicks. All steps are explained below.
The only tool you need is the BTDEX wallet, download it from https://btdex.trade/.
For Windows users BTDEX is just an executable file. Move it to any folder you want and run the executable. All configurations you make are stored in a file on the same folder of your executable, so you need to remember where you put it. After running it, you should be welcomed with a dialogue to create your account:
Make sure you write down your recovery phrase on a piece of paper and choose a PIN. With the recovery phrase you can access your account even if you lose access to your computer or forget your PIN. No one should see your recovery phrase, so store it somewhere safe, just as you would cash or jewelry.
Now you go to the MINING tab to prepare your disks, also known as plotting:
You should select one folder per disk you want to use. This folder will store the so-called plot files. For every disk you selected, use the corresponding slider to the right of it to select the amount of space you want to use:
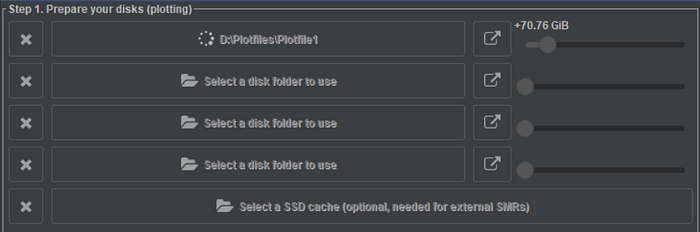
You can start with a small fraction of your free disk space and plot more later if you want. Now just click the “Start Plotting” button and it will start plotting:
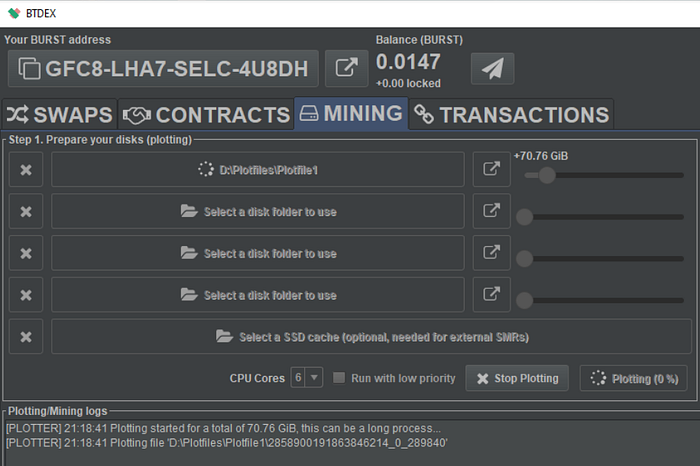
This plotting step is when the heavy computations are executed and it can take many hours (depending on your hardware specs). So if you want to plot many TiB of space, it is better to let it run overnight. Start plotting a few GiBs so you can get the taste of it. You can also select the number of CPU cores it should use and also if it should run with low priority. Be sure to select the “Run with low priority” and not all your CPU cores, if you need to use the PC before plotting is done. In any case, you can stop the process any time with the “Stop Plotting” button and then resume later.
If you have an external SMR disk (they can be very slow when writing plot files) then you should use a cache disk, just click the “Select a SSD cache…” button and select a folder of a faster disk. There is no actual need to be a SSD, but the faster the cache disk is to write data, the better. SSDs are perfect for this task.
Now you can join a mining pool, select one and click “Join Pool”:
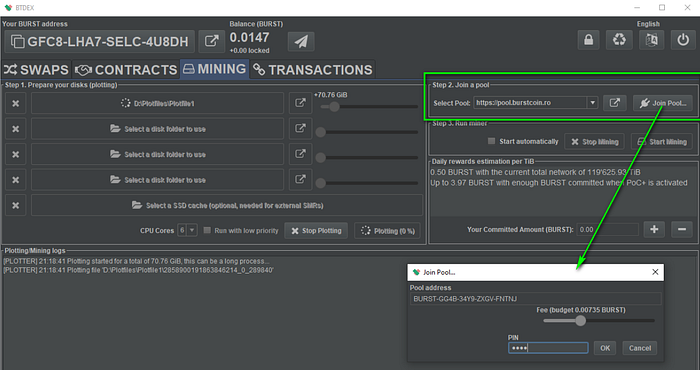
To join a pool you need to make a transaction and for that you need some BURST to pay for the transaction fee. Luckily, every new account created with BTDEX already receives 0.0147 SIGNA, which is enough to make this transaction. After you make this join pool transaction, you need to wait around 16 minutes (4 block confirmations) then you can click on “Start Mining”:

On the bottom “Plotting/Mining logs” panel, you should see some messages, which means you are already mining. Now you can open your pool website (just press the button on the right of the pool selector menu) to check on your performance and pending balance.
If you close the BTDEX application window, it will keep running in the background. Check your System Tray (usually on the bottom right corner of your desktop) for more options and how to quit it.
The BTDEX mining tab also has a built-in calculator, that estimates mining earnings based on the current network state:

At the time of writing, with 1 TiB you should get 0.22 SIGNA per day with no coins committed. If you choose to commit about 4k SIGNA per TiB, rewards go up to 1.78 SIGNA per TiB, 8 times more than with no commitment. This commitment is defined by the amount of SIGNA a miner locks to be used in the mining process (similar to stake for those familiar with the term). This way you can boost your mining capacity without having to buy new equipment or plotting new files, you just have to lock some SIGNA. Think about it, this is even greener and more sustainable.
Happy home/green/sustainable crypto mining!
BTDEX/TRT Discord server: https://discord.gg/VQ6sFAY
Edit: reward estimates were updated at November 2021.
